
How to Make Wind Chimes from Vintage Silverware
Do you love a pretty wind chime? Want to know how to make one yourself? Turns out there are just six easy steps to create your own lovely wind chime out of silverware. Let me show you how.
The other day, I was really lucky at a flea market nearby. I came home with lots of vintage silverware that looked old, tattered, and lovely. There was a lot of it. Not a matching set but rather an odd collection of various spoons, knives, and forks in different sizes and designs.
And just look at how pretty those old, antique pieces of silverware are!

I had a whole box full of them. Most were too dinged and damaged to even consider using them as tableware, so…
That led, of course, to the question: what to do with a box of vintage silver-plated silverware?
This is what I came up with:
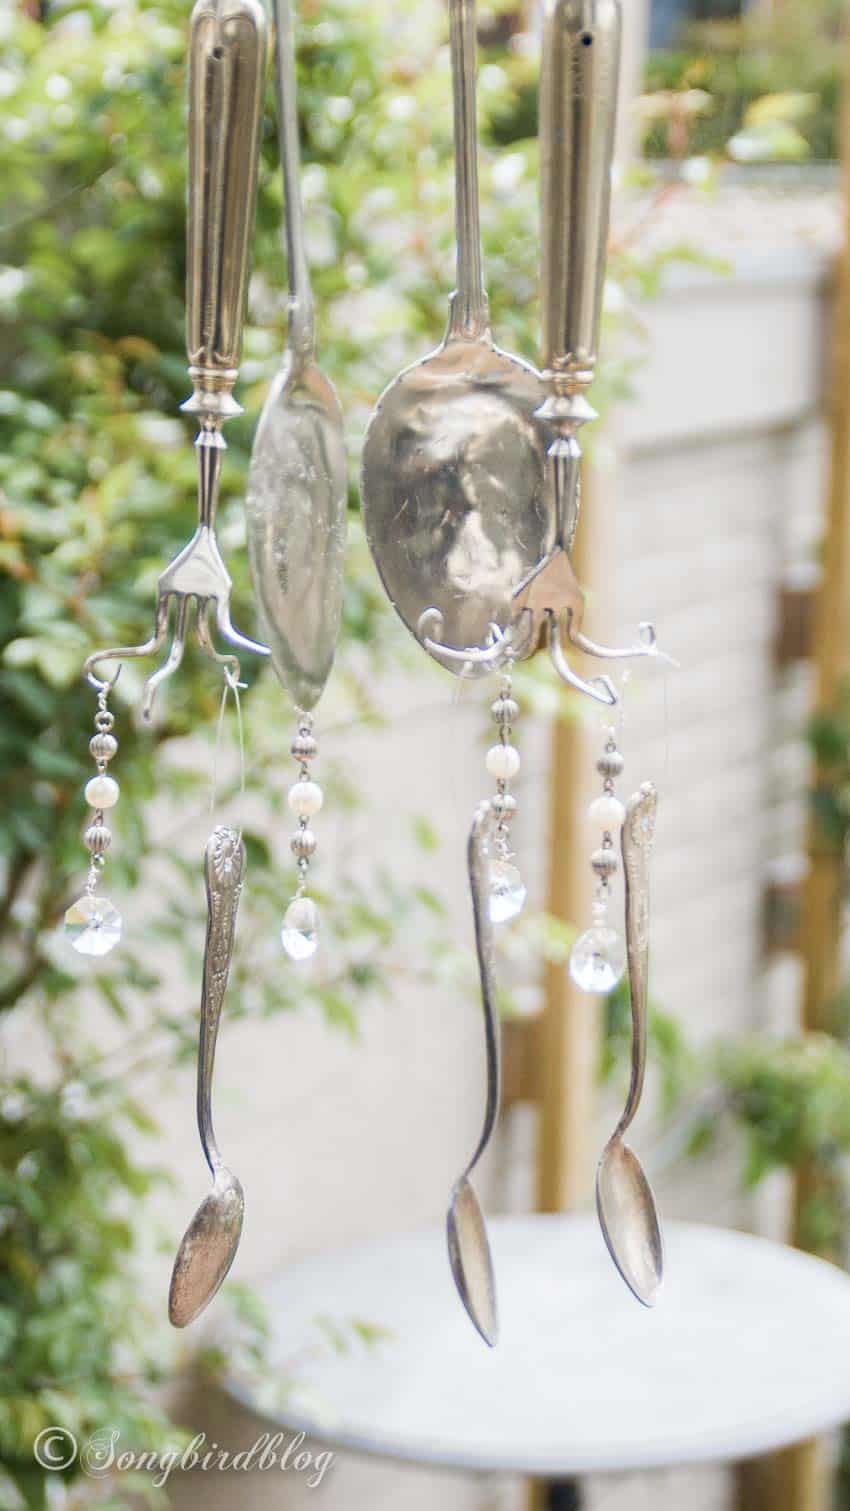
A very pretty silverware wind chime. Oh, the sound of the tingling and dangling. It is just so lovely.
I know you want one too, don’t you? Let me show you how to make one.

What can I make out of old silverware?
This old silverware was destined to become a craft supply, and I decided to make something for my garden. Something to add a little music to my life. Something whimsical and fun.
I made wind chimes out of the vintage cutlery, and as it turned out that was a fun project that was much easier than I imagined.

Silverware wind chimes instructions
Making these vintage silverware wind chimes really wasn’t that hard. Let me go over the steps really quick, so you’ll know what is involved. And then keep reading for more details and the tips and tricks I learned by making these wind chimes myself.
It all starts with finding enough pieces of silverware to make at least two tiers, but better yet enough for three. Choose the most lightweight silverware you can find, or it won’t dangle so much and the sound will not be as nice.
If you aren’t as lucky as I was and can’t find a stash of vintage silverware at a flea market, try the thrift store. Any old silverware will do, you will need forks and spoons, knives are optional.
Other materials you’ll need are thin wire, fishing line or very strong nylon thread and optionally, but cute are beads and baubles for decoration.
You only need some basic tools, you probably already have in your workshop, like a drill, a hammer, different sets of pliers and maybe a vice.

Basic Steps for Making Spoon and Fork Wind Chimes
- Flatten the spoons with the hammer or in the vice
- Twist and turn the tines of the forks into a cross shape. Curl the outer edge up or under
- Drill holes in the handles of the spoons and forks.
- Make hanging loops on all the cutlery and assemble the wind chime.
Here is a more in-depth step-by-step tutorial for making these vintage silverware wind chimes.
How To Make Wind Chimes From Silverware in Six Easy Steps
Step 1. Gather Your Supplies
You will need:
- random pieces of silverware including spoons and forks
- thin wire, thread, or fishing line
- hammer
- heavy-duty needle-nose pliers
- heavy-duty flat-nose pliers
- cordless drill with small metal drill bit
- vise (optional)
- optional: beads and pearls for decoration.
Step 2. How to Bend Silverware
Choose a nice big fork to function as the top and the main ‘hanger’. Choose two more that can be smaller.
With the flat-nose, pliers bend the tines of the forks. The first tine to the front, the next to the back, and again to front and back.

Next bend the two outers ones to the side. Make sure to go gently and keep moving the pliers up and down along the tine so it won’t break. You’ll end up with a kind of cross shape.

Then with the needle nose pliers bend the tips upwards (or downwards, your choice).
Again be gentle and patient so the fork won’t break. I did this with some smaller forks too, so I could make a third tier. But that will depend on the design you choose to make.

This is the most difficult part of the whole process. The smaller forks were so delicate that I accidentally broke off the hook on one end. Luckily I had a spare so I could try again.
You don’t need a lot of force to do this, just patience. Especially when working with brittle vintage silverware.
Step 3. How to Flatten Spoons
Spoons make the most beautiful sound, so be sure to include some spoons.
I wanted to have flattened spoons and found it quite hard to flatten them with a hammer (no patience).
Ah well if you aren’t strong you’d better be clever. How to flatten spoons with one easy trick: I put my spoons in the vise on my workbench and squished them flat that way.

I used two pieces of a rubber from in inner bicycle tire to cover my vise so my spoons wouldn’t get scratched too badly. Keep moving the spoon in the vise until it is nice and flat.
Step 4. How to Make Holes in Silverware
Last step in this part of the wind chime making process is drilling the holes in your pieces of silverware. If you are wondering how to drill a hole in metal silverware you can use this little trick: Punch a little dent first with a straight pick, it will help prevent the drill from slipping.

Then you can drill the holes for hanging the cutlery on the wind chime.
Remember to use a drill bit meant for metal.

If the edges of your holes are very rough, sand them smooth (mine didn’t need it).
Step 5. How to Attach Silverware Together for a Wind Chime
In order to assemble all the different parts of the wind chimes, tie a loop through the holes in all the handles.

Use the biggest fork as the top of your wind chime. Hang two flattened spoons and two twisted forks on the tines of the first fork.
Make sure the bent tines of the second tier of forks dangle against the spoons. Make adjustments to the length of the wire as you hang them to make sure.
Hang another tier of smaller forks and spoons on the second tier and/or finish this layer with small bangles of beads.
I dug through my stash of beads and jewelry making supplies for the threads and wire and for the buttons and pearls. I love the addition of the little ornaments, they add a whimsical touch to my metal wind chimes.
You can craft your little heart out here and go with any embellishments in any color setting you like. Try it out from time to time to see how it looks and if it all jingles nicely together.
I threaded fishing line through the holes in my spoons and forks and used special knots to attach it all together. The hardest part is preventing the knot in the fishing wire from slipping. There is a special technique for that called a surgeon’s knot, it involves winding the thread more than once through the loop. I tried to take an image of how I do it, but I didn’t have enough hands to do that. So I found these instructions for you:

Basically tie a little knot, then run one of the loose ends through the loop twice and then tie another knot. This should secure it, but for extra safety you can put a little glue on the knot too.
Step 6. Find the Perfect Spot for Your Wind Chime
When your wind chimes are assembled and ready it is time to find the perfect spot.
Wind chimes need wind. So hang them somewhere where they can move and catch a breeze.
These silver wind chimes also reflect the sun really nicely so choose a spot where you can see them sparkle. And of course where you can here them tingle.
Since vintage silverware is quite fragile it is best to not expose them to the elements too much. Somewhere under a patio roof or on a covered porch is best.
My final step was trying to take non-blurry pictures while it dangles and tingles in the wind.
I succeeded in this step, I think…
Related Reading
<<<< How to Make Plaster Bowls From Doilies >>>>
<<<< How to Make Lace Ribbon Napkin Rings >>>>
<<<< How to Make a New Mirror Look Old >>>>
Fun wind chime Facts
Did you know that they already had wind chimes in ancient Rome? They were called tintinnabulum! And the Romans believed the soft tingling would ward off evil spirits.
In Asia, they have been around since ancient times as well. Wind chimes of bamboo are considered to bring good luck and are used in Feng Shui.
If you know what you are doing when creating your wind chime you can make them play certain notes. Apparently, there are formulas to determine exactly how long the ropes should be.
If you have several wind chimes hanging in distinct places in your garden, they will tell you where the wind is coming from.

❤️ I’d love you to bits if you would share, like, or pin this post! ❤️

My silverware wind chimes DIY – a sweet little project that turned out exactly like I had planned.

Your wind chime is absolutely lovely! I love how you twirled the forks and used them as hangers. I have a cuttlery chime as well but it looks a little different and I have hung rags in it. I might add some more chrystals in it from a broken chandelier Im working with right now.
This is adorable! I love the way you bent the tines of the forks to use as hangers. The beads add just the right amount of bling and sparkle too. Thanks for sharing!
{{hugs}}
Deborah
oH MAN! I’ve always wanted to make one of these. Does it sound pretty even though it’s not silver? and …I LOVE THE WAY YOU ADDED BLING w/ the fork tines…
I am so looking for cast off flatware now… BECAUSE YOU KNOW I NEVER CAN FIND SILVER.
thanks for showing this– I’m inspired.
Pat
Thank you!! I am happy you like it. Good luck with finding some good flatware (and be glad when it isn’t truly silver because that is so much more brittle and harder to work with).
…what I meant was… does it sound ‘flat’… I totally understand about the brittle silver. Plus– who wants to damage the silver, right?
off to look at your mantel.
Have a great week!
Pat
No, not at all. Flatware doesn’t sound flat. It tingles and jingles quite nicely. But it definitely helped that I flattened the spoons, that gave a much nicer tone.
This is very creative and the style is truly beautiful…
Oh! This would look excellent at my mums allotment, it is very shabby chic already and as well as look good, this would help scare off the pigeons!
Hope you don’t mind me posting the link here 🙂
http://www.homelymissus.blogspot.co.uk/2012/04/shabby-chic-shed.html
No not at all. As long as you put some proper link back to my site you are welcome to share it. Thanks for the compliment!
Wow. This is just beautiful!! Thanks for sharing! I featured this on my blog today: http://www.vixenmade.com/2012/05/10-mothers-day-diy-gifts.html
Wow this beautiful! Thank you so much for sharing your amazing talents! I’m so excited to explore more of your blog, thank you again for sharing!
Dar. ling.
Love it!
Love your wind chime! I have a question though. What is the whole thing attached to? What is your very top?
what does the top look like? I’d like to make these
I love this! Noticed you didn’t reply to last two posts. They asked the same question as I have. What does the top of your wind chime look like? What did you attach to?
I simply started with a fork that has a little hole drilled in the handle. Bended the twines just like I did with the small ones.
Hi 🙂 Love your tips! I am about mid-way through making my first silverware wind chime……I’m using a metal strainer I picked up at the flea market…..I’ve hung knives, forks and spoons adorned with beads etc…….all I need to do is glue some artificial flowers inside the bowl part and then attach chains to be able to hang it……of course, will do little things to it as I get closer to finishing it……I SO enjoy crafts!!! I’ll be making 2 more once this one is completed……one will be using a metal cheese grader and the other one is an old silver sugar cube holder (don’t know the official name for this piece) ……picked that up for like .50 cents………and a THANKS to MY HONEY for doing all the drilling necessary!!! I’ve already made door wreaths at Christmas using wine corks, turned out quite nice!! After these chimes…..I’ll be making “flip flop” door wreaths! OH MY! Such fun 🙂 Keep making em people!!! WOOHOOO!!
Sounds like fun. I am sure it all turned out beautiful.
Thanks for sharing with us about how to make a crystal hanging wind chime with silverware.
Thanks for sharing with us about how to make a with silverware.